
One of the most detailed projects we’ve done so far has been Liam’s Nursery.
It was another one of those ones where I pin a ton of ideas on Pinterest and then start combining everything until I have exactly what I want (with Tim’s input also, of course).
We decided we wanted a two-tone room and after painting the walls a bunch of different colors, we settled on our two favorites: Grey and teal. Somewhat similar to Dakota’s room but I assure you they are different tones… and we left the purple out of his room.

Next, we decided on a “theme”. We chose safari animals!! (Hence the knobs for the dresser from this post). I’m so happy with this theme, it has really captured Liam’s interest from the moment he could see a more detailed view of the world. Although, this did cause some long nights of nursing while he lay wide awake looking at all the colorful animal decals on his nursery walls. But I wouldn’t change those moments for anything.
The first step in actually making all these decisions come to fruition was to get the supplies. We decided on Board and Batten walls which required lumber…

Just for a point of reference, here are some before pictures of his room (took these a little late in the game LOL):


To accomplish the board and batten look we had to remove the baseboards that already existed. To do this, Tim just found a YouTube instructional video which showed a technique using a crowbar, hammer and putty knife. It was very efficient and caused very minimal damage to the walls underneath (I was kind-of concerned LOL).
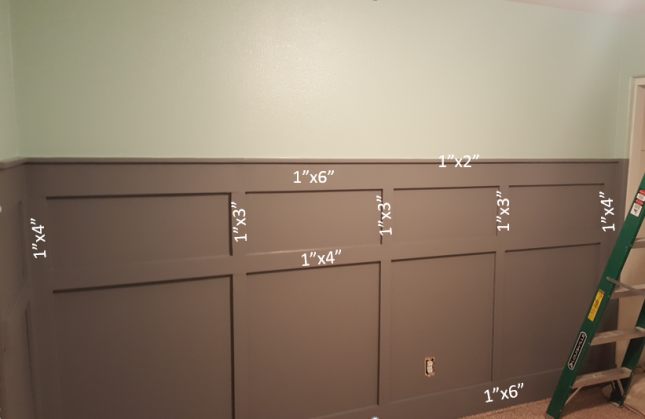
Once the baseboards were off we did our best at propping the wood up to see exactly how many boards we wanted to lay down, how high, etc. We decided we wanted to do different thicknesses and based that decision off many, many, Pinterest pictures. We finally landed on 1”x8” board around the bottom (basically the baseboards), 1”x4” boards on each vertical outside edge, the remainder of the vertical boards were 1”x3”, the horizontal board going all the way around the room in the middle portion was 1”x4” then the top horizontal board was 1”x6”. To finish it off we wanted a (very small) shelf feature which was 1”x2” (the 2” portion being the “shelf”).
Here’s a visual of the above:
So, the next step was just measure and cut. We started out with just one wall because we were terrified of cutting all the wood wrong. Once we had the correct lengths we used Wood Glue to glue the boards to the wall, and then also used a nail gun for extra security. For the corner pieces Tim cut a 45º chamfer along the length of the board so it would fit nice and snug in the corner, did the same for the mating piece and matched them up to fit the corner 90º angle.


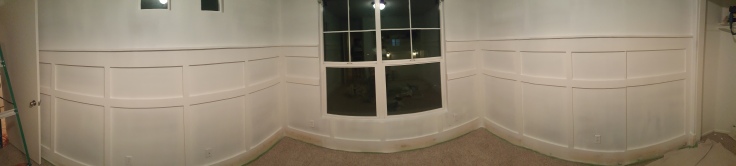
Once all the wood was up Tim used cocking to fill in any gaps between boards. He also filled in the nail gun holes so they were flush against the wood. After everything was nice and flush it was time for primer.
I was about 6 months pregnant at this point so this was ALL Tim. He chose to use the paint gun for the primer so he just put canvas down snug up against the wall to protect the carpet and went for it (I took a couple panoramic pictures which is why they look a little awkward).


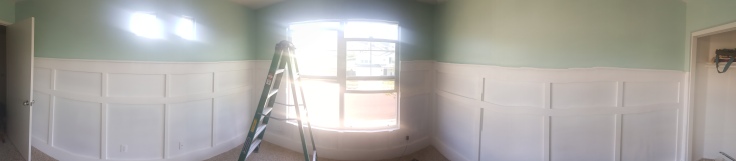
Next up – paint! Tim chose to roll the color on, just because the spray gun requires a lot of taping/masking around the edges. This decision was just based off preference, either method is good.
He painted the mint color first, then the grey. The lighting for the pictures is odd in some of these, I’ve indicated below which look most like the real life color…


This is closer to the actual color, I think the mint actually pops out more in real life, though.


Once everything was dry (I think we waited about 2 weeks just due to time constraints) we hung up the decals! We ordered all our decals off amazon, we only had issues with one brand, it wouldn’t stick no matter what we did (I don’t remember which brand it was). Due to the climate here (i.e. hot summers), we chose to take extra precaution and used some spray glue (3M) for some of the thinner decals (like the palm trees and giraffe neck). It worked well, 1.5 years later everything is still up!
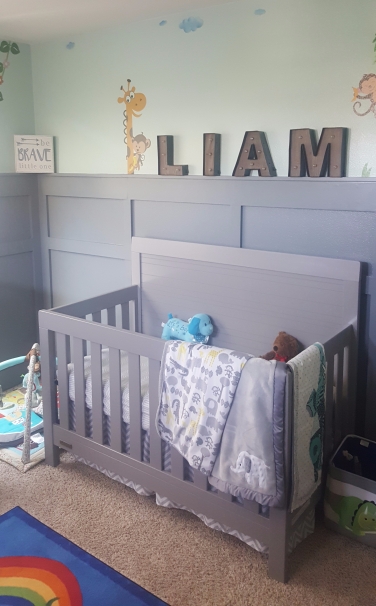
We also decided to get some marquee letters of his name, a few hanging signs, and a cute Noah’s Ark rug to add to the animal theme.
And… ta-da!


More pictures can also be found on my DIY Chalk Painted Dresser Post: here

Leave a comment