Search

houseofthecardsblog

Month

July 2017

A Hiking Adventure with the GoPro Hero 5 Black

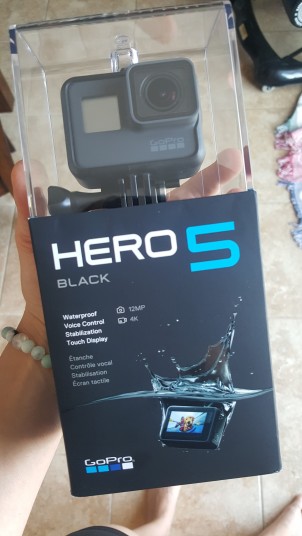
A couple weeks ago we decided to buy the GoPro Hero 5 Black.

We honestly weren’t even looking to buy one, but then Amazon Prime day rolled around and their marketing definitely got the best of me.

I have the very handy Amazon shopping app, and on Prime day it kept sending me notifications for all the great things we could buy. The GoPro was one of them. Since Amazon Prime Day was just 24 hours, we didn’t have much time to think about it, so at the end of the day we decided we would hold off and think more. The next day I had a pit in my stomach thinking about the deal we missed out on. I was pretty sure we’d end up getting one and now we just lost out on saving $80.

So, I made it my mission to check deals daily from that day forward. Two weeks later, Target had a deal! Buy the GoPro and get a $50 Target gift card. We also have the Red card so 5% off and free pick up in the store meant we got $70ish dollars off. Not quite 80, but I didn’t want to risk missing another good deal.

20170719_180427

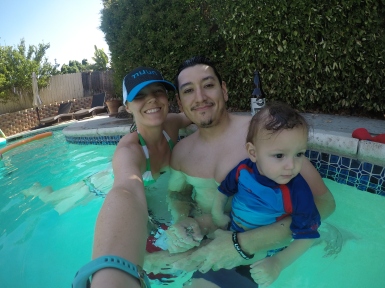
One of the circumstances for purchasing it was we had to actually used it.  I know that sounds pretty silly, but we are both terrible at taking pictures and capturing moments on film. I’m pretty good at getting cute things Liam does at home on camera, but when it comes to all three of us out and about, we are terrible. We didn’t even get any pictures of us at Liam’s 1st birthday party. I’m so bitter about that.

Anyhow, I’ve been really wanting to start hiking, swimming and just getting out of the house in general more, so this seemed like a pretty decent motivator.

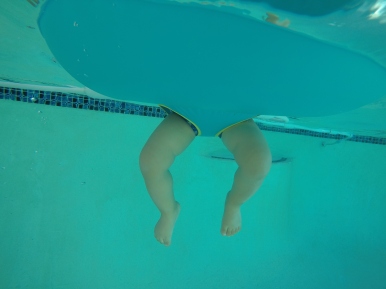
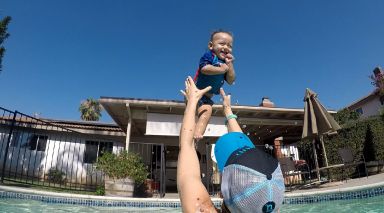
Two weekends ago we took it for a test run in the pool:

download_20170722_220720

download_20170722_220740

Resized_CC55CF5E77BEB8E4A578956C20C09854

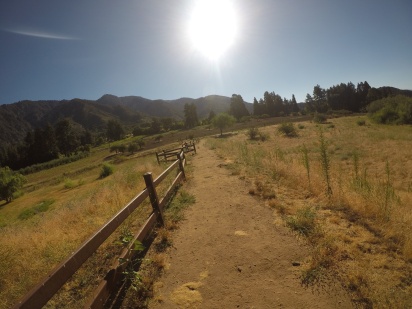
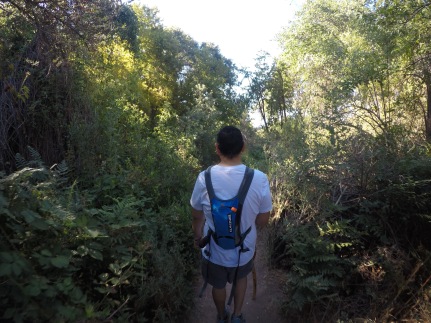
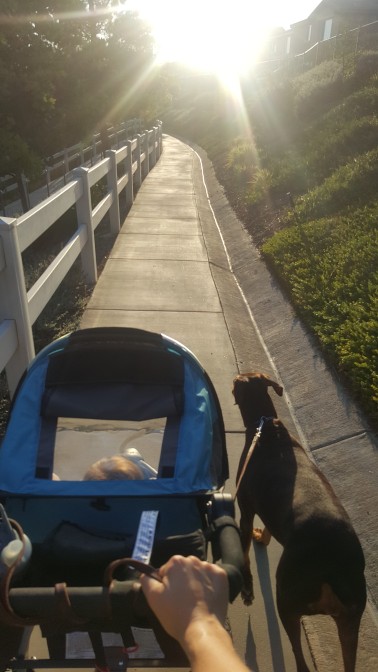
This weekend we took it for a hike! It was our first real hike with Liam and it went great. I wore him on my back in the Ergobaby 360; but if we continue to go on these adventures I definitely want one of those handy hiking baby backpacks. My back didn’t hurt, but as he grows I know it’s going to be difficult. Plus, all the bouncing actually put him to sleep and then his poor head was just bobbling around towards the end. We put the head cover thing on, but he got too hot and just wiggled out of it.

The GoPro worked great, I am really happy with it (outside of some minor annoyances with wifi connections, but it might be user-error, still uncertain there).

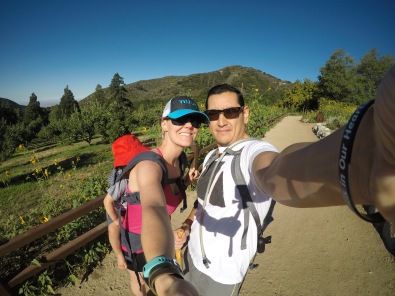
We also need a better-quality selfie-stick, the one we got kept spinning around if it was in certain positions.

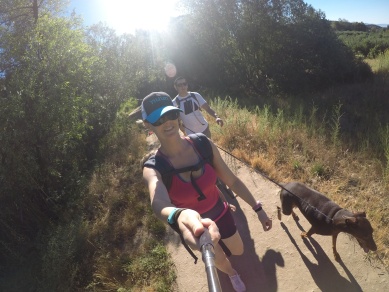
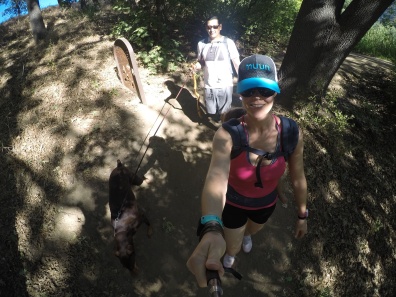
Selfie stick pictures:

DCIM100GOPROGOPR0122.JPG

DCIM100GOPROGOPR0176.JPG

DCIM100GOPROGOPR0125.JPG

DCIM100GOPROGOPR0149.JPG

DCIM100GOPROGOPR0154.JPG

DCIM100GOPROGOPR0159.JPG

DCIM100GOPROGOPR0136.JPG

DCIM100GOPROGOPR0170.JPG

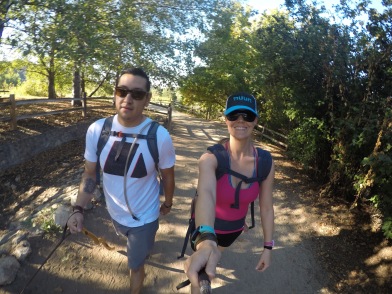
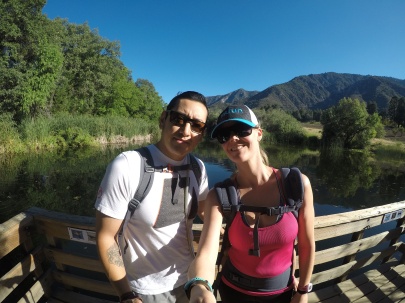
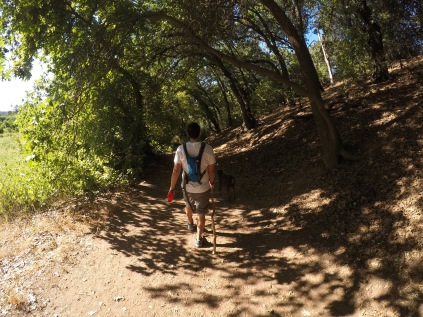
The hike this weekend was pretty great, too. It felt really good just to get out into nature and have my boys with me.

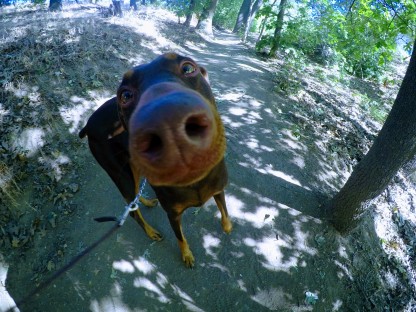
And our girl, Dakota 😊

DCIM100GOPROGOPR0123.JPG

GOPR0145_1501350635035_high-EFFECTS

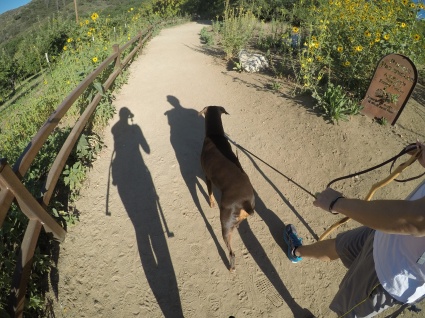
Rocky can’t handle adventures like this so he was at home enjoying his peace and quiet.

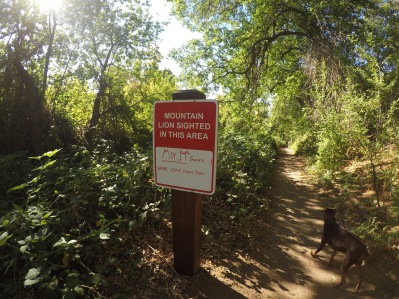
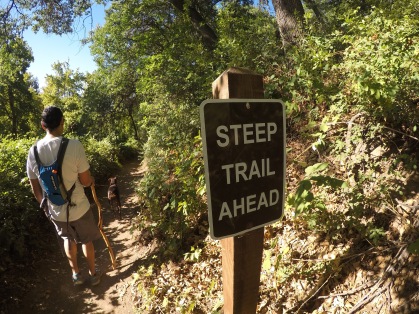
We did have quite the scare, though. At the beginning of the trail there was a huge sign that said the last time bears and mountain lions had been spotted on the trail; A black bear was just spotted 10 days prior, and a mountain lion back in mid-May. And of course, rattle snakes were seen regularly, and while those scare me to no end, I can deal with just turning around and walking away or walking WAY FAR around one. The bears and mountain lions are a different story.

We had just started on a section of trail that was pretty heavily wooded (I use that term loosely, though, since not much is “wooded” down here in Southern California) when we started hearing VERY loud rustling up a steep hill next to us. It wasn’t a bird or small animal rustling, it was definitely large-animal noises. We stopped, didn’t hesitate much, turned around and bolted out of there quickly. We chose another trail and ended up looping back to this one. By that time a large group of people had already gone through and we figured we would be ok. So, we headed through and tested it out. Sure enough, we heard it again, but not nearly as prominent. We stopped, looked around a little and decided to continue ahead. About 100 yards ahead there was a VERY large pile of poop. Not only was it large, but it was fresh, within the last couple of hours at most, and filled with the wild berries we saw all along the trail.

So, without actually seeing what the animal was, we decided it was a black bear or mountain lion. If nothing else, it makes for a good story 😊

Tim scoping the situation out:


DCIM100GOPROGOPR0162.JPG

DCIM100GOPROGOPR0163.JPG

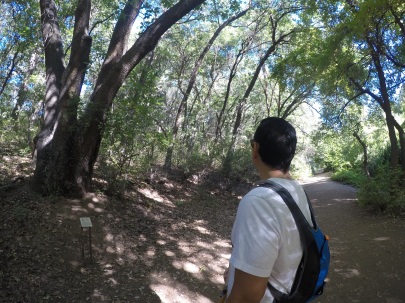
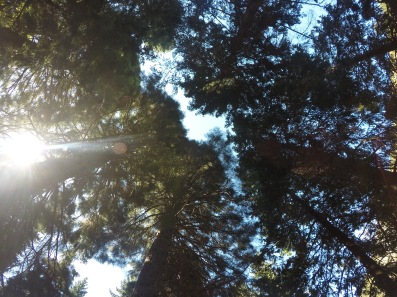
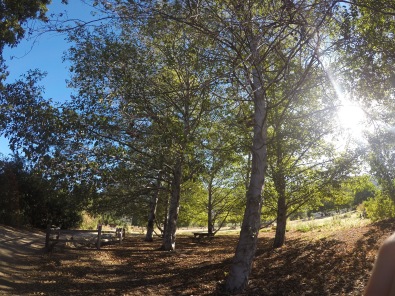
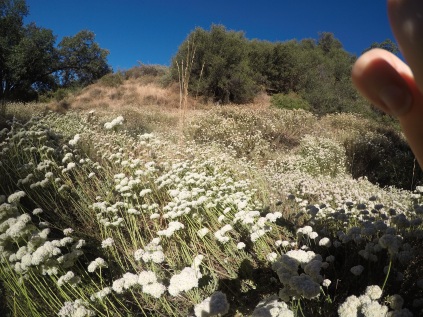
And just some other pictures along the way, I even liked how well it took pictures of scenery, too!

DCIM100GOPROGOPR0175.JPG

DCIM100GOPROGOPR0127.JPG

DCIM100GOPROGOPR0138.JPG

DCIM100GOPROGOPR0147.JPG

DCIM100GOPROGOPR0158.JPG

DCIM100GOPROGOPR0164.JPG

DCIM100GOPROGOPR0167.JPG

DCIM100GOPROGOPR0168.JPG

DCIM100GOPROGOPR0171.JPG

Juice Recipe

Tim and I started juicing daily around the same time we decided to eliminate animal products. We aren’t perfect, there are days when I’m WAY too tired to even think about cutting, washing, juicing, cleaning which means “no juice for you!” But most days I get it done, or if I don’t Tim graciously takes care of it 😊

Wednesday was one of those days. It was just long and hard and luckily Tim had my back and made a delicious juice.

This makes 2 large juices:

8 large carrots (no need to peel, but cut into smaller pieces for easier juicing)

A whole head of celery (I just cut the end of the head off, wash and then cut that all in half)

1 whole lemon (cut in half, not peeled)

1 whole lime (cut in half, not peeled)

2 green apples

2 small beets (peeled)

½” – 1” chunk of ginger (no need to peel)

The secret to making this whole process easier is definitely the “clever cutters”. We broke ours about a month ago and I was lost for about a week. I swear, it’s the difference between dreading making juice and not hating it all that much. Ha!

Clever cutters:

https://www.amazon.com/dp/B01D1ZH93G/ref=cm_sw_r_em_apa_nSlEzbSFEF1W1

DIY Entry Way Table

Let’s go back in time, once again, and talk about the entry way table Tim made.

Basically, I find pretty pictures on Instagram or Pinterest and share them non-stop with Tim until the project is done. No, he actually loves doing it, but I do like to believe my over-sharing of ideas helps 😊

Anyway, this one is from Shanty2Chic. Love them.

We made a couple alterations (ours is longer and the color is different), but we did follow the basic plan they have on their site (FREE!).

Here are the plans we followed:

DIY Sawhorse Console Table http://www.shanty-2-chic.com/2015/02/diy-sawhorse-console-table-free-woodworking-plans.html

And since the steps are outlined above – and we did a very poor job at taking pictures along the way – I’m not going to go into any step-by-step guides (especially since the plans aren’t even our own!); but here is the final outcome:

This is when we first made it:

*Note: the angle some of these pictures were taken makes it look a little uneven, it’s not, I promise! It’s in a very awkward position for taking pictures*

1

2

3

Then Thanksgiving came along (our Christmas set up was so pretty but apparently I didn’t take any pictures):

4

Valentines:

5

And now, with a bit more wall décor:

6

7

The entire table, (wood, brackets, stain, wax) cost about $75 to make. Can’t beat that!

DIY Paper Flowers (Rookie Edition)

A while back (ahem, over a year ago!) I decided making paper flowers was going to be my newest hobby. Until I actually made the paper flowers. Yeah – they were pretty easy in general, but didn’t look near as amazing as I thought they would. Having them all over the house may be a little too much. So, I settled on making these and then giving up on my career in paper flower making.

Here’s a quick step-by-step, in case anyone is interested.

  1. Pick your paper. In hindsight, I would definitely pick paper that had print on BOTH sides. Meh.20160409_165650
  2. Cut a square, approximately 8” x 8”20160409_165723
  3. Take that square and make it into a circle. It doesn’t need to be perfect, in fact, the more imperfect it is the better.20160409_165756
  4. Cut the circle into a spiral, make sure to cut out a 1” circle in the center.20160409_165906.jpg
  5. Take the outside end of the spiral and start rolling it up. You can roll it around a pencil for a more uniform roll, and it might be easier, too… I did it free-style.20160409_165935
  6. Keep rolling…. Until you’ve reached the end20160409_170039
  7. Time to glue – let the tension in the flower relax a bit so it opens up wide. Use a hot or cold glue gun to secure the end of the spiral to the outside of the flower. I kept it towards the bottom to make it less noticeable.20160409_17013320160409_17022320160409_170100
  8. Take that 1” circle you cut out earlier and glue it to the bottom to close the flower off. This part was tricky for me, it definitely didn’t want to stay put.20160409_170501
  9. You can buy fake stems from a craft store and be fancy, or be creative like me and use more paper. These are paper flowers, after all. I just folded a small piece length-wise into about 1/4” thick “stem” and glued it shut the full length.20160409_170733
  10. I cut one end so I could make little flaps, about ½” long.20160409_170803.jpg
  11. And then glue those to the bottom of the flower.
  12. 20160409_170845

The stem integrity is questionable… but I have had these sitting on our mantle for over a year and they’re still intact. So, I guess it’s a win!

And this is why if I were to ever do this again I would use paper that was printed on BOTH sides 😊

20160409_171630

Chalk Painting Liam’s Dressers

A lot of our DIY projects are just sitting in our phones waiting to be documented. One of which is the dressers we used in Liam’s nursery. (Nursery post to come, also!).

These dressers have been in my family for decades. My mom had them, my cousins, me and now Liam. At one point I believe my mom painted/touched them up, but that was also decades ago. I wanted something a little more boy-ish and up-to-date. So chalk paint to the rescue!

As usual, I did my Pinterest research first. After tons of pinning, we decided to do blue and white stripes. I also did a lot of research on which Chalk paint was pregnancy and baby safe; we landed Annie Sloan Chalk Paint. Luckily, we have a local antique shop who is a distributor so we went to have a chat with them and check out all the colors. As I recall we both went in thinking like a baby blue / teal color and ended up with a deep turquoise/ocean blue, it was way too pretty to pass up! We also splurged on an Annie Sloan brush (well worth it!).

And here are the dressers before paint:

2

3

The great thing about chalk paint is that you don’t have to sand. This was an amazing benefit being 8-ish months pregnant and not really able to move around too well – painting was about all I could handle! The only prep required is rinsing with soapy water.

4

Next we removed the drawers and hardware (Rocky had to make an appearance):

And then painted everything white. We did two coats. You can pretty much slop the paint on then even out. It’s really forgiving!

78

We let them dry for at least 24hours (knowing us we probably let them sit an entire week until the next weekend 😊). Then it was time to tape and paint the blue.

9

The drawers were the hardest part just because of the ridges. I sat on my stability ball and kept at it though.

We decided to make uneven lines just to mix it up a bit. After the paint dried we removed the tape and went in for minor touch-ups with a very small brush.

You can see how some of the paint oozed into the tape just because of those dreaded drawer features. Such a pain.

10

Next we made some rope handles.. unfortunately I don’t have good pictures of this process. We basically bought a roll of rope thick rope, opened up the already existing handle mounting holes and then clamped the rope on the inside using pipe clamps. The ends were fused with fire.

We also decided to line the insides of the drawers.

1211

I also don’t have great pictures of them, but we bought little animal handles for the top two drawers, also. We found them at Home Depot, the picture is clickable (Side note: I prefer Lowes……..).

animal handles

In case the picture link doesnt work — http://www.homedepot.com/p/Hickory-Hardware-Safari-1-5-8-in-Hand-Painted-Orange-Cabinet-Knob-P3283-ORG/100674523

The last step, which I also don’t have pictures of, is the wax finish. I couldn’t partake in this part of the project because the wax is not pregnancy safe, so Tim did this all on his own. Basically, you slop some on and push it around with the paint brush or a rag – whichever you prefer – until its nice and even.

While he was out in the garage doing this, I decided to paint a mirror to go over the dresser. Very quick and easy!

131415

And there you have it!  (a couple of the animal handles are missing because the screws were too short at that time.)

1617191820

Let’s Talk About Coffee & My Vegan “Half-and-Half” Replacement

Coffee. Be still my heart.

Sometimes it’s the only thing that gets me up and out of bed on a workday.

If you scroll through my pictures you’ll see:

  1. Liam
  2. Tim and the dogs
  3. Coffee

Ok, that may be an exaggeration, but not too far off the mark. I just love me some good ol’ coffee.

Typical weekday breakfast layout. (Yes, we have a ginormous baby gate, and it’s amazing).

Not just any coffee though – it’s gotta be cold brew. I like the occasional hot cup on a cold day, but there really aren’t too many of those here in Southern California. I’d say 362 days a year I’ll have a cold brew in hand.

My coffee preferences over the years have changed but one constant was always the addition of half-and-half. Sometimes I think I had more cream than coffee in my cup. Oops.

So when we decided to go Vegan this was probably the HARDEST thing for me to accept. No more half-and-half? What ever will I do???

At first I thought, well, it’s just a little bit, I can allow that. But I guess my all-or-nothing mentality got the best of me and I was forced to find an alternative.

Some people like almond milk, coconut milk, coconut cream, etc… unfortunately it’s just not for me – maybe I’m doing it all wrong.

At any rate, the best thing I’ve found is Cashew Creamer! It’s super thick and creamy and REALLY easy to make.  I’ve made a few different versions of this, but the following combination tends to turn out the best.  

Cashew “half-and-half”

1/4C – 1/2C Raw Cashews (depends on how thick you want it, I tend to go towards the 1/2C serving)

1/4tsp Vanilla Extract (Optional)

Mason Jar

Filtered water

Put the cashews in a mason jar and fill with filtered water. Set in refrigerator overnight (at a minimum, I typically put it in for 24hours).

Once ready, drain the water and rinse cashews. Re-fill the jar with filtered water leaving about 1/2” from the top then pour it all into blender (I use magic bullet). Add the vanilla extract, if using, and blend for 1 minute. Pour back into the mason jar for storage, it should keep well for 5 or so days (mine never lasts that long 😊).

I actually prefer it without the vanilla, but it’s a good addition on occasion.

Keeping Up With The Trend…

Blogging two days in a row? What? I don’t even know who I am anymore.

I feel like this blog is going to take a major left turn, maybe even U-Turn from its original intent. Because today I have nothing DIY related, once again. Does this make me a “lifestyle blogger”? I’m so green I don’t even know how to use blogging terminology (and don’t really care – gasp!).

I really like Thursday evenings. There’s something about them that allows me to let go of my anxious personality and just go-with-the-flow. I still have to come home, clean pump parts and get them ready again for Friday… clean Liam’s bottles and food containers, re-label everything and fill them back up for Friday.. Clean our lunch Tupperware.. put away dishes and probably clean more dishes.. make our overnight oats for the next two days.. make our daily Juice (didn’t happen yesterday, though, I underestimated our carrot and celery stock, oops).. feed the dogs.. feed Liam (multiple times).. keep an eye on Liam (hello couch-climber).. ugh. It’s exhausting. I’m just so blessed to have an amazing hubby on my team to help with the cooking, taking out the trash, picking up the dog poo and the other half of the dishes that I don’t get to! I’ve truly been blessed in the husband department, that’s for sure.

What was I even talking about? Oh yeah, Thursdays. There’s just something about knowing the next day is Friday, I don’t have to come home and worry about all the afore-mentioned things, I can just throw my bags down and plop on the couch if I so choose! I’m a high-stress individual so any time I feel relief I’m stoked. Thursday evenings are great for that reason alone.

So about last night.. We did all of the above then split off to get some workouts in. Tim headed to the gym while I decided to go for a run. Before getting pregnant I loved running. Then it was just too stinkin’ hard. I’ve wanted to get back to it, but having a kid is a time-suck (don’t get me wrong, the best time-suck I could ask for!). Luckily, I can take Liam running with me. And Dakota. Although very difficult with a dog who likes to pull on the leash, but, I made it work.

I started slow, 2 minutes walking and 2 minutes jogging 5 times each, and we managed to go 1.86 miles.

20170720_190751

I then attempted a 6 minute yoga for abs (shout out Yoga With Adriene!) but, alas, Liam would have none of that. Mom sitting on the ground means his milk is fair game! His? Mine? Not sure WHO it actually belongs to at this point.

Then.. dinner. Mushroom and Leek Risotto. Delicious! Liam couldn’t get enough of it, either.

20170720_193307

(I’m not a real blogger so please excuse the terrible food pictures).

This recipe was straight from The Minimalist Baker. We pretty much stalk her on social media awaiting the next amazing vegan dish. Tim always adds his own touch, so I can’t say that it’s an exact recipe, but definitely derived from her site. (cred: https://minimalistbaker.com/mushroom-and-leek-risotto/).

Then the struggle of getting Liam to sleep began. But hey, it was Thursday, no big deal

I shall leave you with an overnight oats recipe. My current favorite. (P.S. I’m no good at measuring things, so these are all estimates).

1/2-3/4 Cup Dry Oats

1 tsp Pumpkin Pie Spice

1/4 Cup Raisins

1/4 Cup Pecan Pieces

1-1.5 T Honey

Vanilla Ripple (optional)

Almond Milk (unsweetened)

Add all dry ingredients to a mason jar. Top with honey then pour Ripple in until ingredients are barely covered and fill jar with Almond Milk stopping about 1″ from the top. Cover and let sit in the refrigerator overnight (or make multiple jars for the week at once!).

Going Vegan

Hello! It’s been a while. I’m REALLY good at this whole blogging thing.

I constantly think about blogging, but when it comes time to actually make the time to do so, I just don’t. Well, I can’t say that I just don’t – I have a 1-year-old wreaking havoc on my free time 😃

I’m still not sure what direction to take this blog. It’s called “House of the Cards” with the original intent on posting all the DIY projects we do. But those have slowed down (WAY DOWN) since Liam has been in our lives. So maybe the content scope can change to “any darn thing I feel like writing about”.

Side note: Do you ever feel like the internet/our phones can hear us THINK? I literally just got an email from Bloglovin titled “Get Back to Blogging!” – Seriously?!

So, today, I feel like writing about our decision to go vegan. Tim and I decided to go 100% Vegan back in late February. We had already cut down on our meat and dairy quite significantly starting in January, but didn’t fully commit until after Tim’s seafood broil birthday party – priorities! Honestly, I was kind of terrified, I’m pretty sure Tim was too. We’ve been meat-eaters our entire lives, and from about age 22-29 I was eating about 5-6 meals per day that contained animal products (meat and/or dairy). I mean, protein in large amounts like that is vital, right? (insert major eye roll).

Our original intent was to go RAW vegan for 90 days then re-evaluate. We quickly learned RAW vegan was pretty rough. I mean, it was great, we felt good, but eating raw uncooked veggies 100% of the time is HARD. We started adding in oatmeal, rice and quinoa; then progressed into adding even more options like rice-based pastas, organic sourdough (in limited amounts) and small amounts of Tofu. Tim’s creativity capabilities in the kitchen and general love for cooking have really paid off during this whole process – I think it’s the most important part of our transition, keeping great flavors and a wide variety of meals each week.

By the time the 90 days were up we were feeling so good and enjoying the food so much that neither of us really wanted to go back to being carnivores. At least full-time carnivores. We’ve had Salmon 2x in the past 5 weeks, and have enjoyed it, but don’t feel like we need it as a staple. We have not had any other animal product. I think we’re both open to it as an occasional splurge, but even so, the times we’ve been faced with these opportunities to splurge we’ve found meat-free alternatives. Liam’s 1st birthday is a prime example – we hired a taco guy to come serve a variety of meat based tacos, but we decided to make our own Tofu-based tacos (honestly, more fabulous than any of the meat they offered).

We started this adventure for improved health and couldn’t be happier with the results. We’re feeling like our bodies are functioning better and we’re healthier. And with dinners and lunches like this “Grilled Veggie Pea Pesto Sandwich on Sourdough” who would complain?!

Resized_20170718_182845

Create a free website or blog at WordPress.com.

Up ↑